How to Draw a Dragonfly Tutorial Easy
Learning how to draw a dragonfly is a really interesting topic because once you know the method, you can play around with giving your dragonfly further details. Creating a realistic dragonfly drawing is also really easy and can be done with a few simple tips and tricks. Dragonflies are very unique and the meaning around them changes according to how they are contextualized within a drawing. Dragonfly art functions within various genres and can be a mystical, scientific, horrific, or peaceful addition to an artwork. Their structure is beautiful and grotesque which gives them this strange appeal and defines them as a symbol of mysticism and fantasy. Whether you create a simple dragonfly illustration as a singular artwork or decide to create a realistic dragonfly drawing that functions as an addition to a larger artwork, this creature can be used in all sorts of ways. Dragonflies are beautiful and fun to draw, knowing how to draw a dragonfly is a great asset to have in your drawing repertoire.
Table of Contents
- 1 An Easy Guide to Drawing a Dragonfly
- 1.1 Necessary Materials
- 1.2 Preparation
- 2 Step-by-Step Instructions on How to Draw a Dragonfly
- 2.1 Sketching the Body
- 2.2 Sketching the Legs
- 2.3 Sketching the Wings
- 2.4 Shading the Body with Ballpoint Pen
- 2.5 Filling In the Wings with a Ballpoint Pen
- 2.6 Adding Some Color
- 3 Tips to Remember
- 4 Frequently Asked Questions
- 4.1 How Do You Draw Dragonfly Wings?
- 4.2 How Do You Draw the Body of the Dragonfly?
An Easy Guide to Drawing a Dragonfly
As we learn how to draw a dragonfly, we will learn very quickly that the drawing process is quite simple and easy. A dragonfly drawing may seem complex; however, dragonflies are pretty easy to draw using simple line work.
The use of symmetry and simple linework are some basic tricks that we can use to create a realistic dragonfly drawing.
In this tutorial, we will see how we can transform a dragonfly sketch into a more realistic dragonfly drawing. We will also see how the dragonfly coloring and little additional details can develop the basic dragonfly sketch into a more realistic dragonfly drawing. This tutorial helps you to create a beautiful and realistic dragonfly drawing using a few simple tools that are easily accessible.
Necessary Materials
For this tutorial on how to draw a dragonfly, we will use very common materials. We will start with a simple dragonfly sketch which we will develop with a pencil. We want to make sure we have an eraser and a sharpener for the pencil drawing process of the tutorial, that way we can have sharp lines and erase any silly mistakes along the way.
Dragonflies are quite dark, which means as we create our dragonfly illustration, we want to capture this quality.
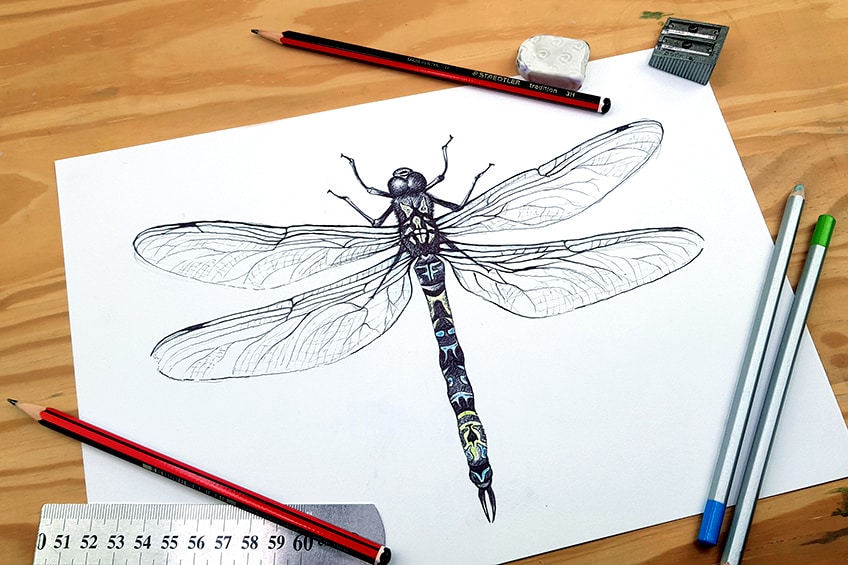 This means we will be using a ballpoint pen in this tutorial to give the dragonfly drawing a more vivid and contrasted quality. Lastly, we will be using a basic coloring pencil, just to give the insect a little color which will make it unique. All these materials can be found through the links below:
- HB pencil
- Colored pencils
- Ballpoint pen
- Eraser
- Sharpener
- Good paper (200 g/m – 250 g/m recommended)
Preparation
Once we have all our materials, we can now begin to prepare ourselves for the dragonfly drawing process. A dragonfly drawing is not the most difficult drawing process, however, being in a space where you can engage with each step is only going to help you throughout the drawing process.
As we create an interesting and unique dragonfly illustration, we will want to make sure that we can focus on each step, so try to place yourself within a quiet environment.
Step-by-Step Instructions on How to Draw a Dragonfly
In this tutorial, learning how to draw a dragonfly is broken up into a few simple digestible steps. We will begin the tutorial with a simple dragonfly sketch, where we use a straight line to help create symmetry within the drawing. We will start from the head and go all the way down to the tail. We will then proceed with our pencil sketch by drawing the legs and wings of the dragonfly.
Once we have our dragonfly pencil sketch, we can then proceed to an ad in pen marks using a ballpoint pen. Using our ballpoint pen, we will start to add color and shading to the insect.
We will use the pencil sketch to guide the pen drawing process as we go over each feature of the dragonfly. Lastly, we will add some hints of color to give the dragonfly a nuanced quality, making it unique and giving a more organic quality. Now that we know what to expect, let us go through this tutorial on how to draw a dragonfly!
Sketching the Body
We can begin by drawing a simple vertical line down the page using our pencil and ruler. We want to make a simple line through the page which will help us to draw a symmetrical dragonfly body. From here we can begin to draw the head and body of the dragonfly. A good suggestion is to get an image from the internet as a reference, however, it is not necessary.
The head and body or thorax could be described as a bean shape connected to two circles. The circles would be the eyes and the bean shape would be the body/thorax of the dragonfly.
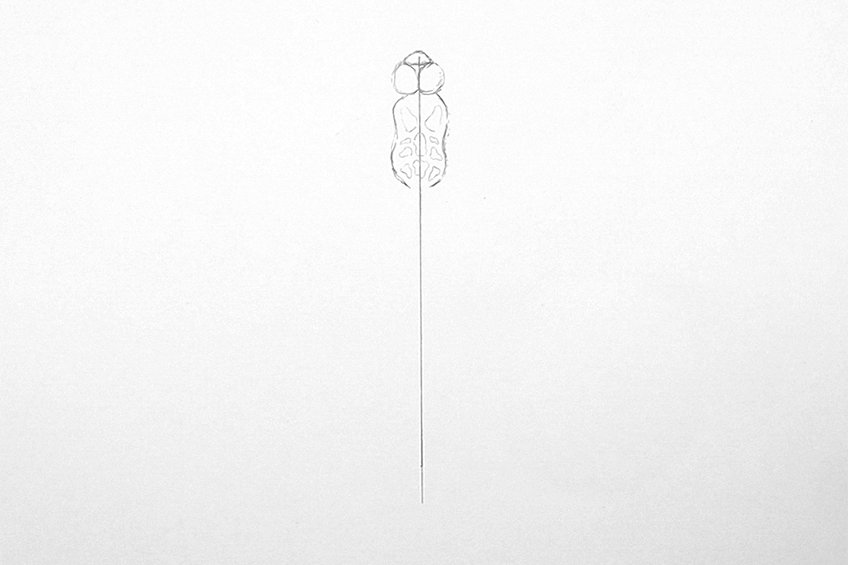 The most important aspect to remember is keeping symmetry throughout the shape and form of the dragonfly. This means the shape should be the same on either side of the vertical line. We want to make sure we draw two even circles for the eyes and the body would be like a bean shape that is even on either side of the vertical line.
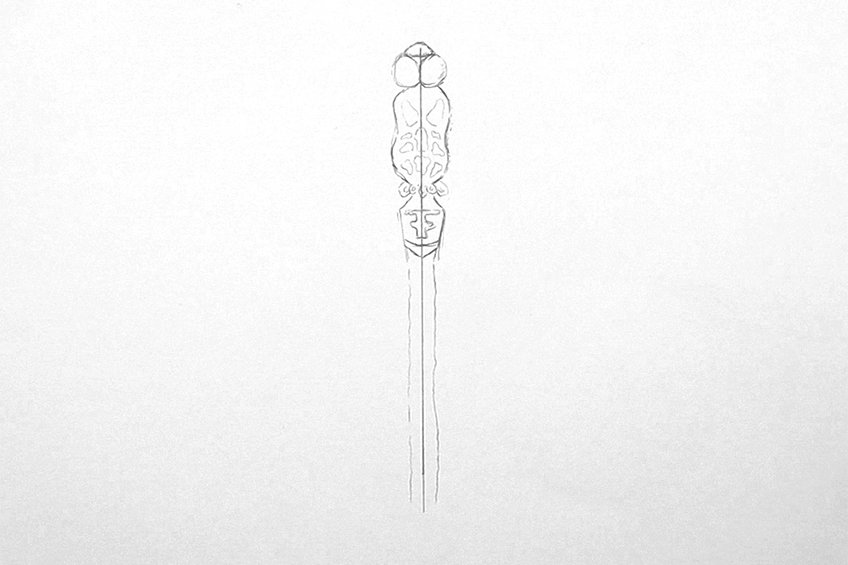 From there we can go down the body structure of the dragonfly drawing. As we create a realistic dragonfly drawing, using a reference image will help us to form the body as accurately as possible.
In the next part, we want to draw in the lower section of the thorax, which could be described as an upside-down cone shape.
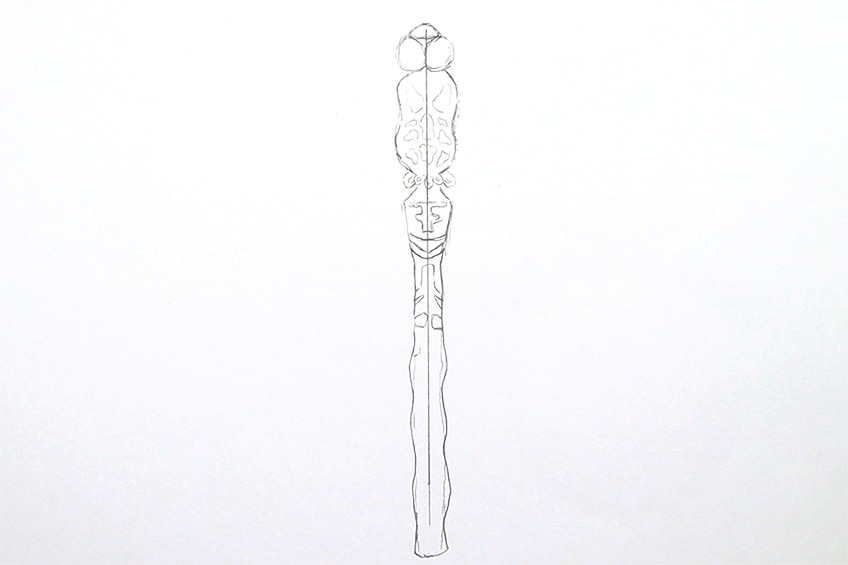 The thorax will flow into the narrow cerci of the dragonfly. The cerci are like the long tail part of the dragonfly, and its shape is like a thin stick. This thin stick-like structure will have subtle bumps and curves, which should be as symmetrical as possible on either side of the vertical line.
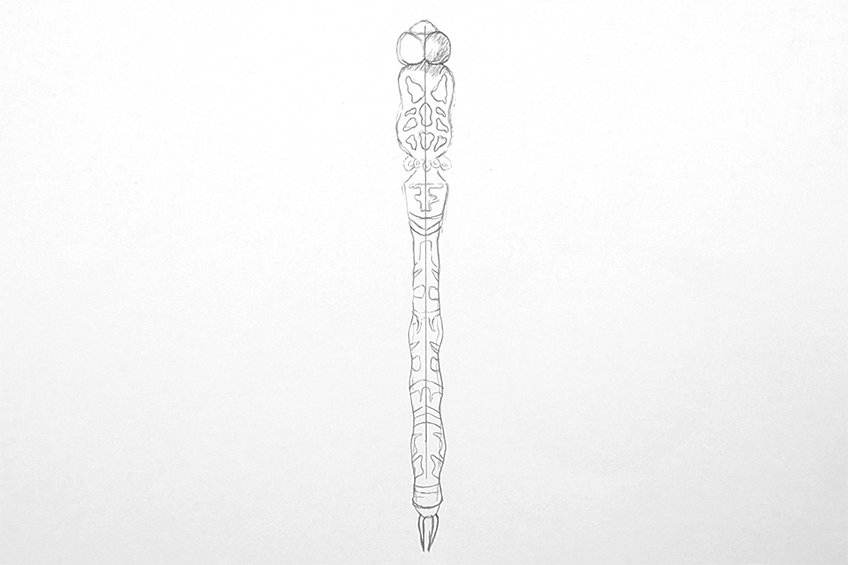 Dragonflies could be seen as totem pole-like structures that have patterns on their cerci/tail structure. Again, use a reference image to see how you can draw these patterns but you can also play around with creating your own patterns.
The main aspect to remember is keeping it symmetrical which will result in a realistic effect. Lastly, the bottom of the cerci has two horns that point downward.
Sketching the Legs
We want to carry on using our pencils, where we will now proceed to draw the legs of the dragonfly. The first two legs will sprout from the eyes and will have a subtle arch shape. The legs should be symmetrical on each side of the dragonfly.
The second pair of legs will follow suit and be formed in the same shape as the first pair, except they will sprout from the sides of the thorax.
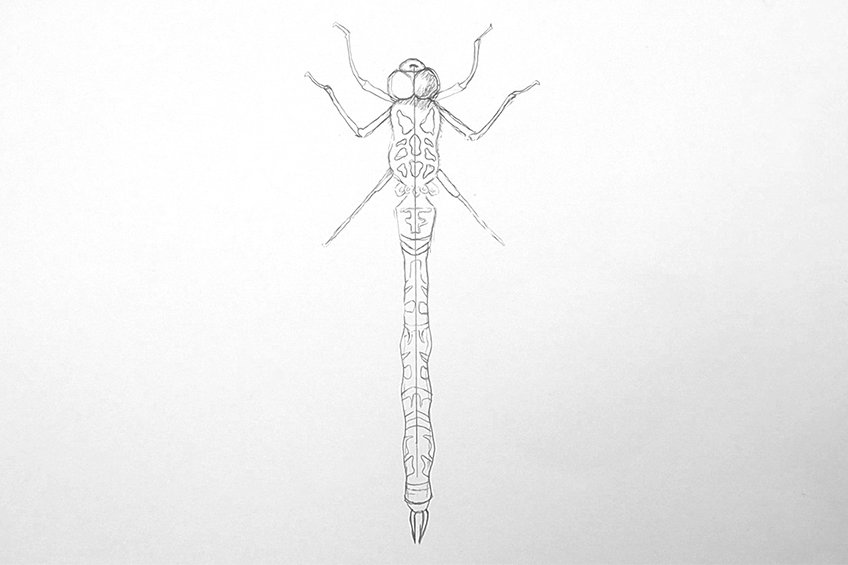
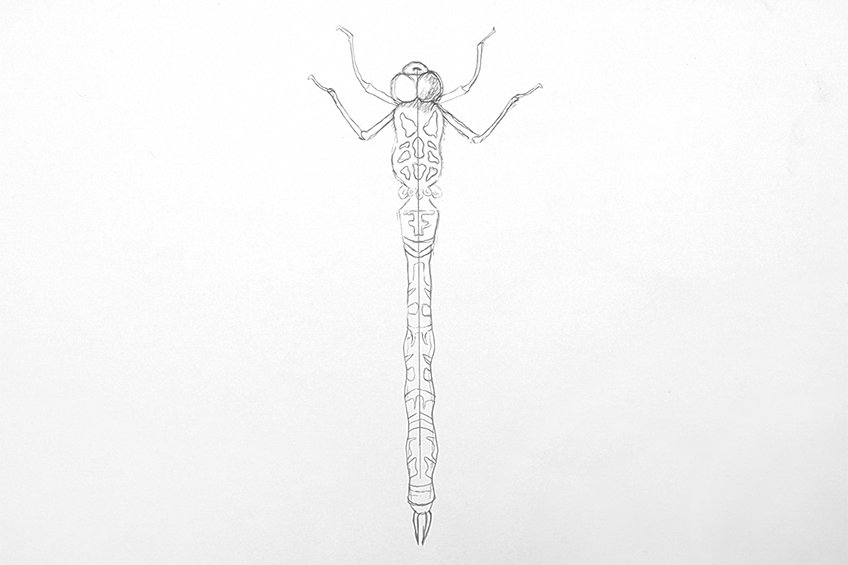 The bottom legs will point in a downward and perpendicular position, sprouting from the bottom of the thorax. These legs will be straight and won't have a bend in their joints like that of the upper two legs. Lastly, all the legs can be divided into two sections, suggesting they have joints.
Sketching the Wings
We will start with the upper or forewings first, which can be drawn with our pencils. The shape of the wings could be seen as a spear-head shape that sprouts from the sides of the thorax in a horizontal fashion.
They should be around the same length as the full body of the dragonfly.
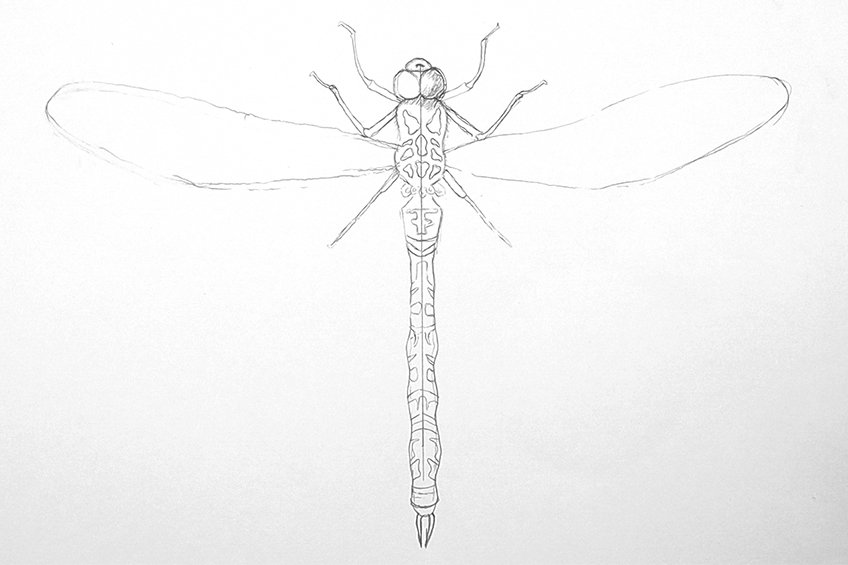 The bottom or hind wings will fall suit and be the same shape, however, they will sprout from slightly lower within the thorax. Both sets of wings will have this spear-headed shape and slightly point upward, rather than point downward. You want the wings to slightly arc upward.
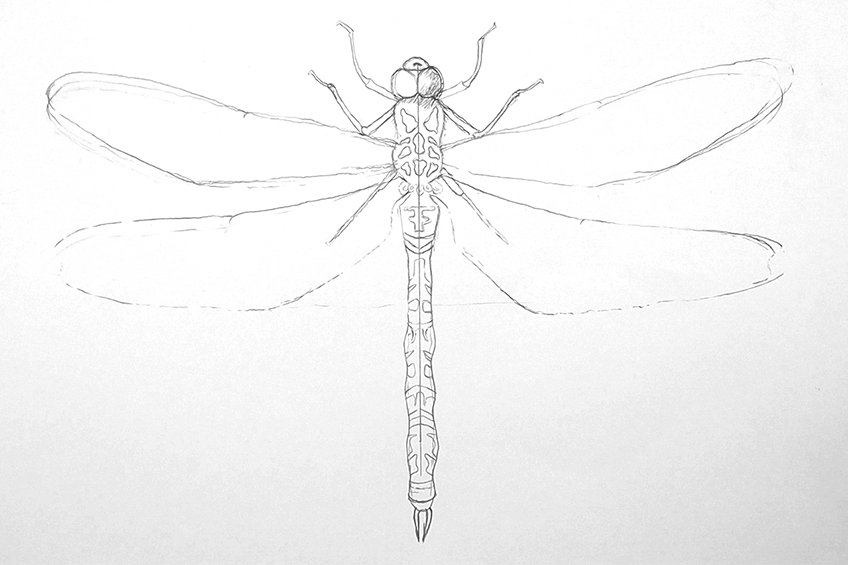 When drawing the vein/web pattern within the wings, we don't need to worry about symmetry. The wing's vein pattern will sprout from the inside near the thorax, they will then disperse throughout the wings.
They will start as thick lines that will get thinner and fainter as they move throughout the wings.
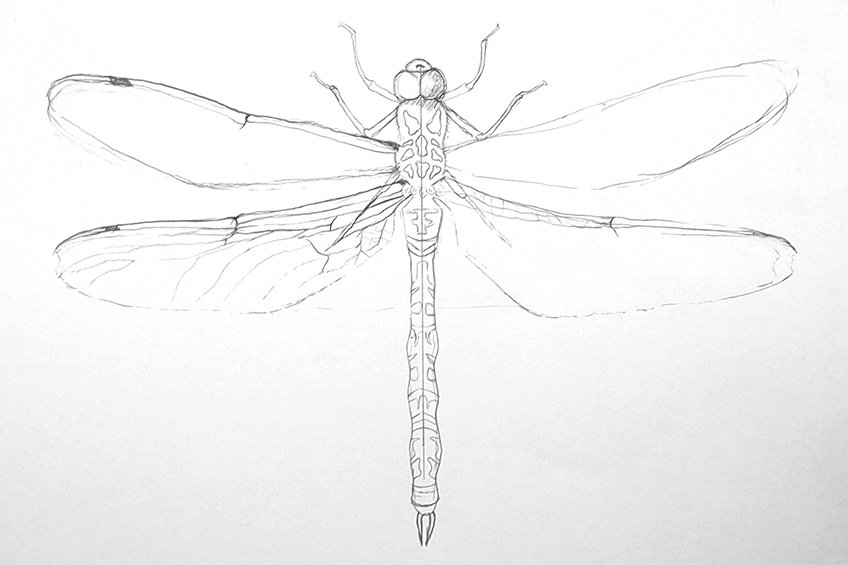 These lines can be quite chaotic in the way they disperse through the structure of the wings. However, we want to make sure that there are thicker lines near the thorax and thinner lines near the bottom of the wings.
The top line or ridge of each wing should also be thicker and darker than the bottom line or ridge of each wing.
You can play around with how you allow the lines to disperse within each wing. Try to remember that the line structure can be sporadic and have an inconsistency that looks similar to branches on a tree. However, as long as the thicker lines remain near the thorax and the top of the wings.
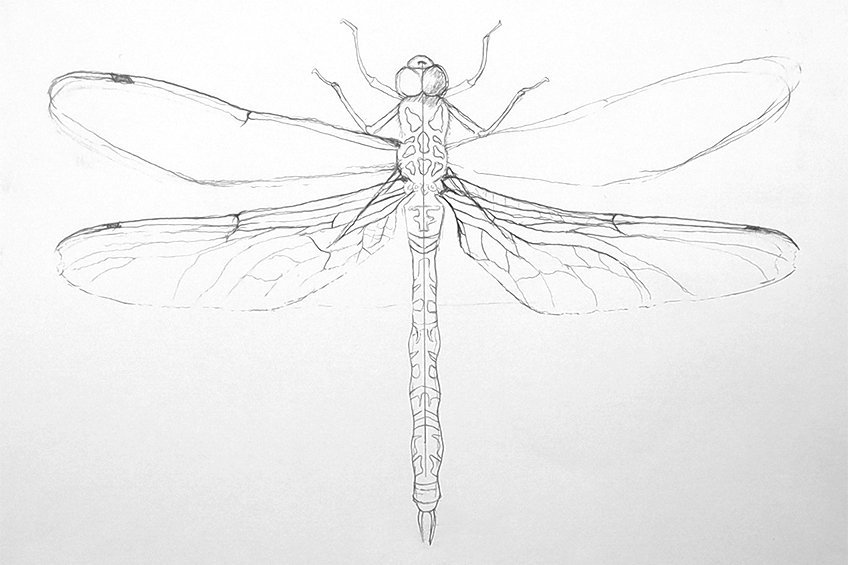 You want to take your time with the wings, this is because you don't want the wings to look symmetrical. However, you want to make sure that they follow the form of the wing's spear-head shape in a horizontal direction. also, the veins structures will all arc downward towards the bottom of the wings.
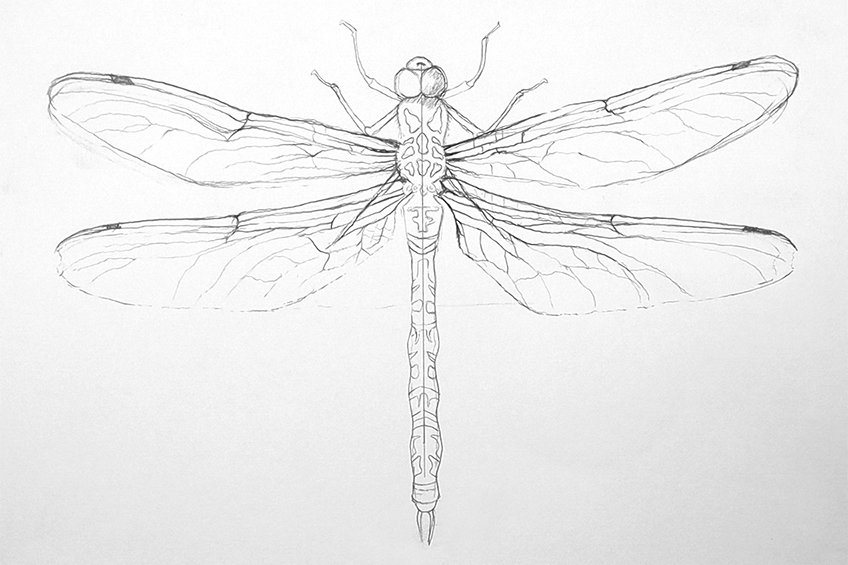 You also don't need to add too many lines within the wings, as this can overcrowd the feature and won't look good.
Again, a good suggestion would be to look at an image of a dragonfly on the internet to get an accurate sense of how the wings are formed and how the veins are dispersed throughout the wings.
Shading the Body with Ballpoint Pen
Dragonflies are predominantly black in their color and a ballpoint pen is a great way to add shading whilst keeping a dark vivid tonal value in the insect. We can start near the eyes and upper thorax; we can make the eyes predominantly black with hints of white to suggest a shine.
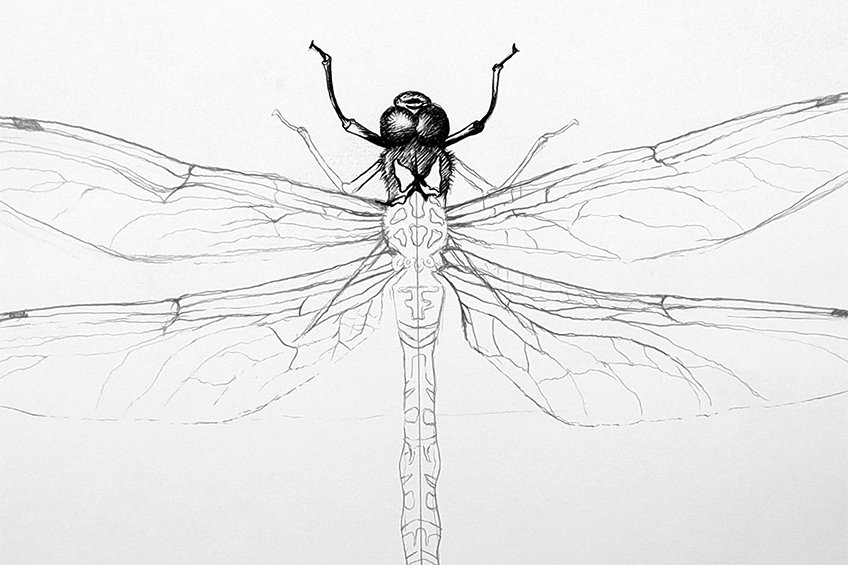 As we move through the thorax, we can color around the patterns within the body, where we can make some areas in the thorax darker and other areas slightly lighter. We want to make sure we leave the patterns on the thorax unshaded, although, we can add small stippling to suggest texture. With the legs, you can color them in with your ballpoint pen, but try to leave areas of white here and there.
This will give the legs a more three-dimensional quality as it will suggest shine on the smooth exoskeleton. Around the thorax, you can add little lines to give the dragonfly a furry quality.
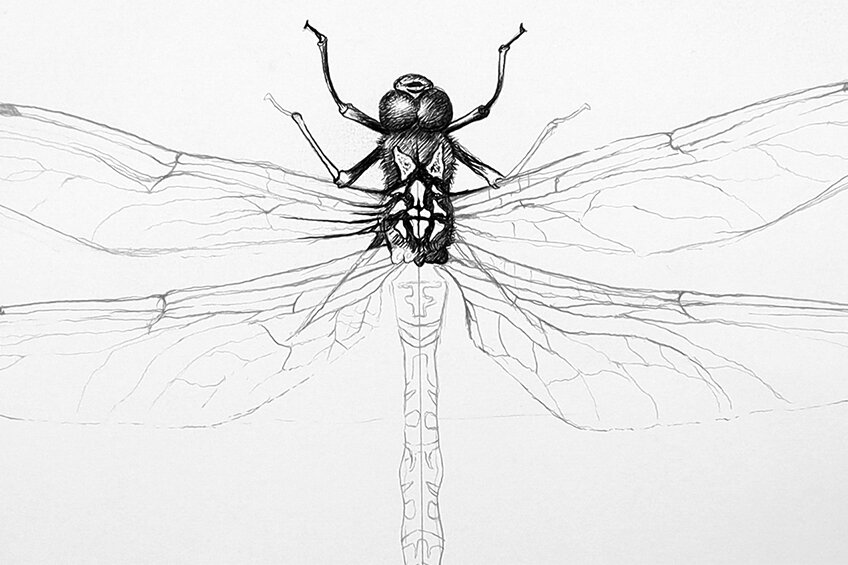 As we move down the full body structure, we can make it predominantly black with our ballpoint pens. That being said, we want to make sure that as we go through the thorax and the cerci, we leave the patterns untouched.
We want to leave them white for adding color to them later on in the tutorial.
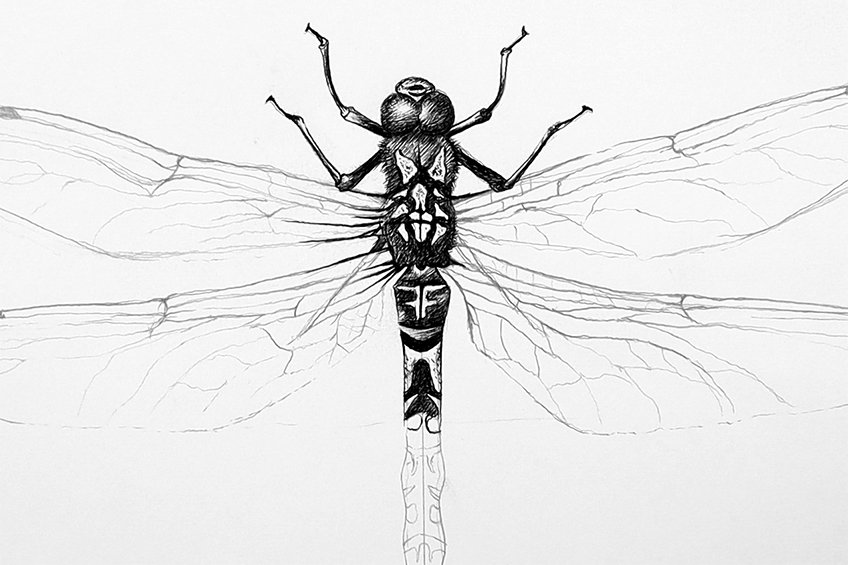 Dragonflies are predominantly black, so you can simply color the whole cerci/tail structure black. You want to make sure your color around the pattern shapes, leaving them white so that they contrast with the black body of the dragonfly.
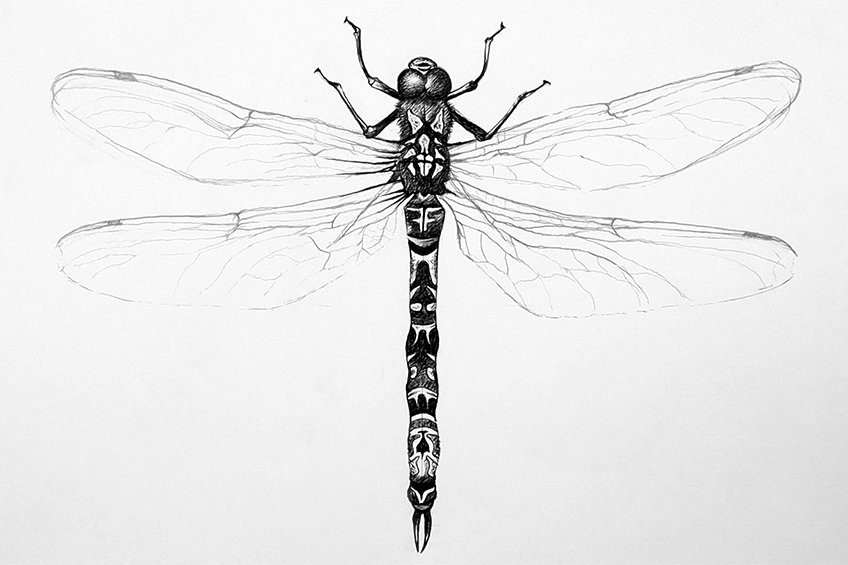 Again, consider the cerci or tail of the dragonflies like a totem statue. You want to make sure that the patterns are all symmetrical and left untouched with your ballpoint pen. You can add in little stipple marks.
However, you just don't want to color them in or shade them in completely.
Filling In the Wings with a Ballpoint Pen
With the wings, the process is a little simpler because we have already drawn all the lines with our pencils. However, this time will simply go over all the lines with our pens. We want to darken and thicken the lines near the thorax and along the top of the wings.
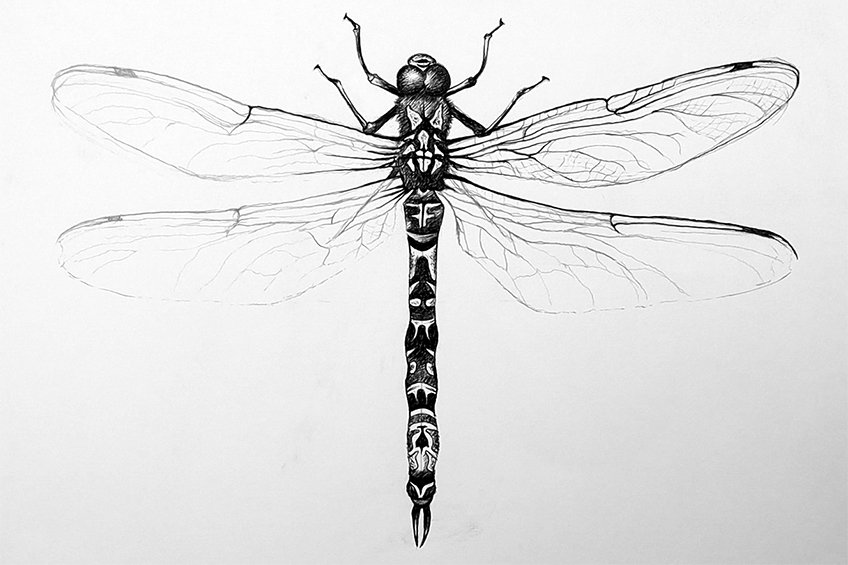 We just want the lines to be thicker near the thorax as this suggests that the skeleton or vein structure is attached to the thorax sturdily and firm. As they disperse through the wings their structure gets thin and faint.
The lines don't need to be thick throughout the whole wing, just near the top and near the thorax.
Near the top of the wings, at the tip of the spearhead shape, we can draw a dark block which is called the pterostigma. These are iconic features within the wings of a dragonfly and are placed at the top of all four wings near the edge of each wing.
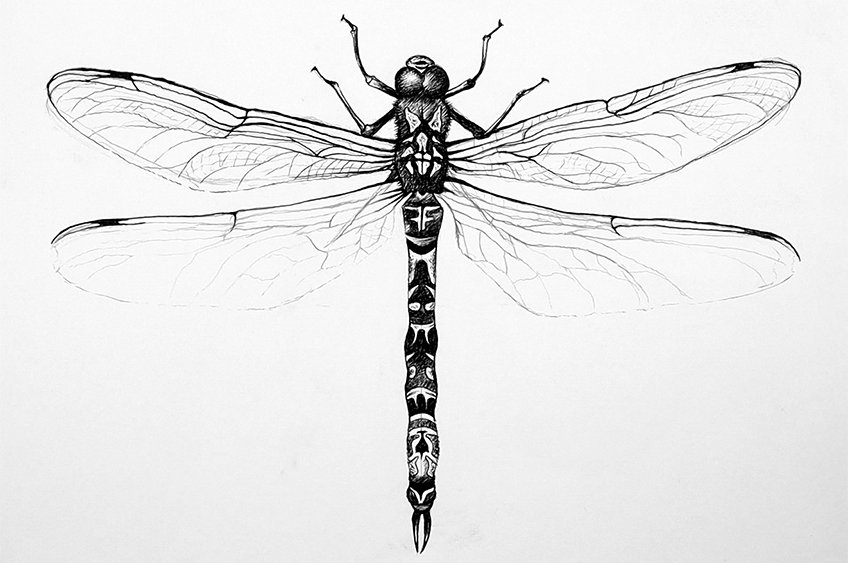 You simply want to take your time going over the lines you drew with your pencils. Try to take your time and be careful, you don't want any unwanted marks drawn in pen. The wings should have a faint and delicate quality, which means the lines will be mostly light throughout the wings. With your pens you can also add in little crossover lines, suggesting a netting quality within the wings. Dragonfly wings have a net-like structure; however, it is very faint in the wings.
We don't need to draw this perfect, but rather add a few light lines to suggest this quality within the wings.
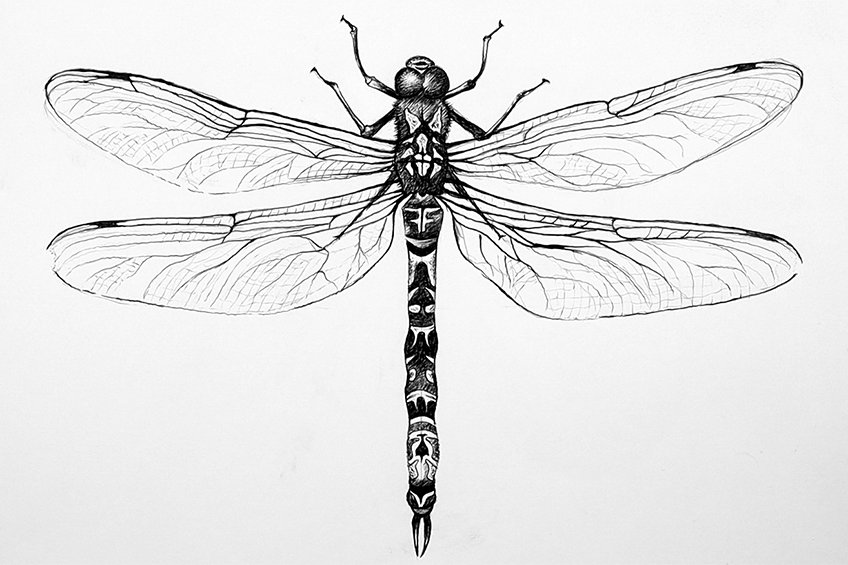 This quality can be added to all the wings; however, you want to keep them faint and light with your ballpoint pen. This quality will result in a more realistic dragonfly drawing and gives more texture to the wings. However, be cautious when adding in these lines.
Adding Some Color
We can now add some color to the dragonfly drawing using simple coloring pencils. We can do this by selecting two colors, as dragonflies are never too colorful but rather have a set of two colors within their bodies.
We can then simply color in the patterns that we have left open and untouched.
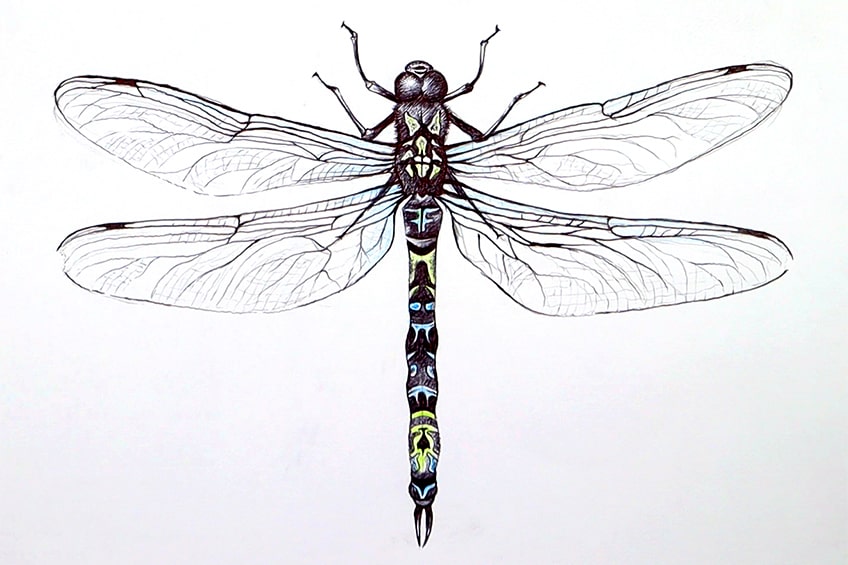 This just gives the image a slightly more realistic quality and suggests a realistic organic feature within the dragonfly drawing. With dragonfly art, there is often too much color added, but it is better to add small amounts of color for a more realistic dragonfly drawing.
And there you have it! A simple tutorial on how to draw a dragonfly.
Tips to Remember
- Work out the dragonfly sketch in pencil first. Make sure you have the drawing captured in pencil before moving on to using a pen.
- Symmetry is key. We want to keep symmetry through all the features; however, we can change details slightly within the wing's web structure.
- Keep your pencil sharp. You want to make sure you capture the little shapes and patterns within the insect's body as accurately as possible.
- Take your time when drawing with a pen. The process of drawing with a pen is not difficult but can come with subtle mistakes if we don't concentrate.
- Be careful with the wings. Not all the lines within the wings are dark and thick, this means we want to be careful when adding thin and lighter lines with our pens.
- Take a break. A dragonfly drawing does come with some fine detailing which can get strenuous. So, remember to take a break.
Learning how to draw a dragonfly is not that difficult and once you understand the process it is quite easy to create a realistic dragonfly drawing. Dragonfly art is really beautiful and once you know how to draw the different features correctly, you can transform a simple dragonfly sketch into a realistic and interesting dragonfly illustration. Now that you know the process play around with how you can use your dragonfly art for different projects and ideas.
Frequently Asked Questions
How Do You Draw Dragonfly Wings?
Dragonfly wings are quite a unique structure with a web-like or vein-like aesthetic. The wings are a spear shape with a set of veins that run from the body and disperse throughout the wings. The thickest line should always be along the top ridge of the wings as well as closest to the body of the dragonfly. These lines then get thinner as they move into the wings and towards the bottom of the wings. The web lines get thinner and lighter as they move towards the bottom of the wings. You want to make sure that you have a variety of thick and thin lines placed correctly within the wings, which will result in a more realistic dragonfly drawing. With dragonfly art, the wings are quite specific, which means we want to capture the transition between thick and thin lines as adequately as possible. Making sure the vein-like lines are thicker near the body and thinner as they disperse throughout the wings is essential for an accurate dragonfly drawing.
How Do You Draw the Body of the Dragonfly?
As you learn how to draw a dragonfly, you will realize that the dragonfly's body looks similar to that of a patterned stick. A good idea is to think of it as a totem stick or a stick with different patterns on it, which makes it quite easy to draw. The best way to start is with a simple vertical line, which you then use to draw the body along. You use the line to guide you as you draw a symmetrical body shape along the vertical line, making sure the little curves are the same on each side of the line. From there, you can play around with the patterns that you draw within the dragon fly's body. The most important key aspect is that you keep the shape of the body as well as the patterns within the body as symmetrical as possible. This will result in a more realistic dragonfly drawing. Lastly, you can keep the structure predominantly black, whilst having the patterns colored in with whichever colors you would like.
Source: https://artincontext.org/how-to-draw-a-dragonfly/
0 Response to "How to Draw a Dragonfly Tutorial Easy"
Post a Comment